How OIDC and OAuth Actually Works Under the Hood ?
There is a good chance you have used "Login with Google" a hundred times without thinking twice about what is happening behind the scenes. And if you are building something, you have probably…
- authentication
- OIDC
- oauth
- backend
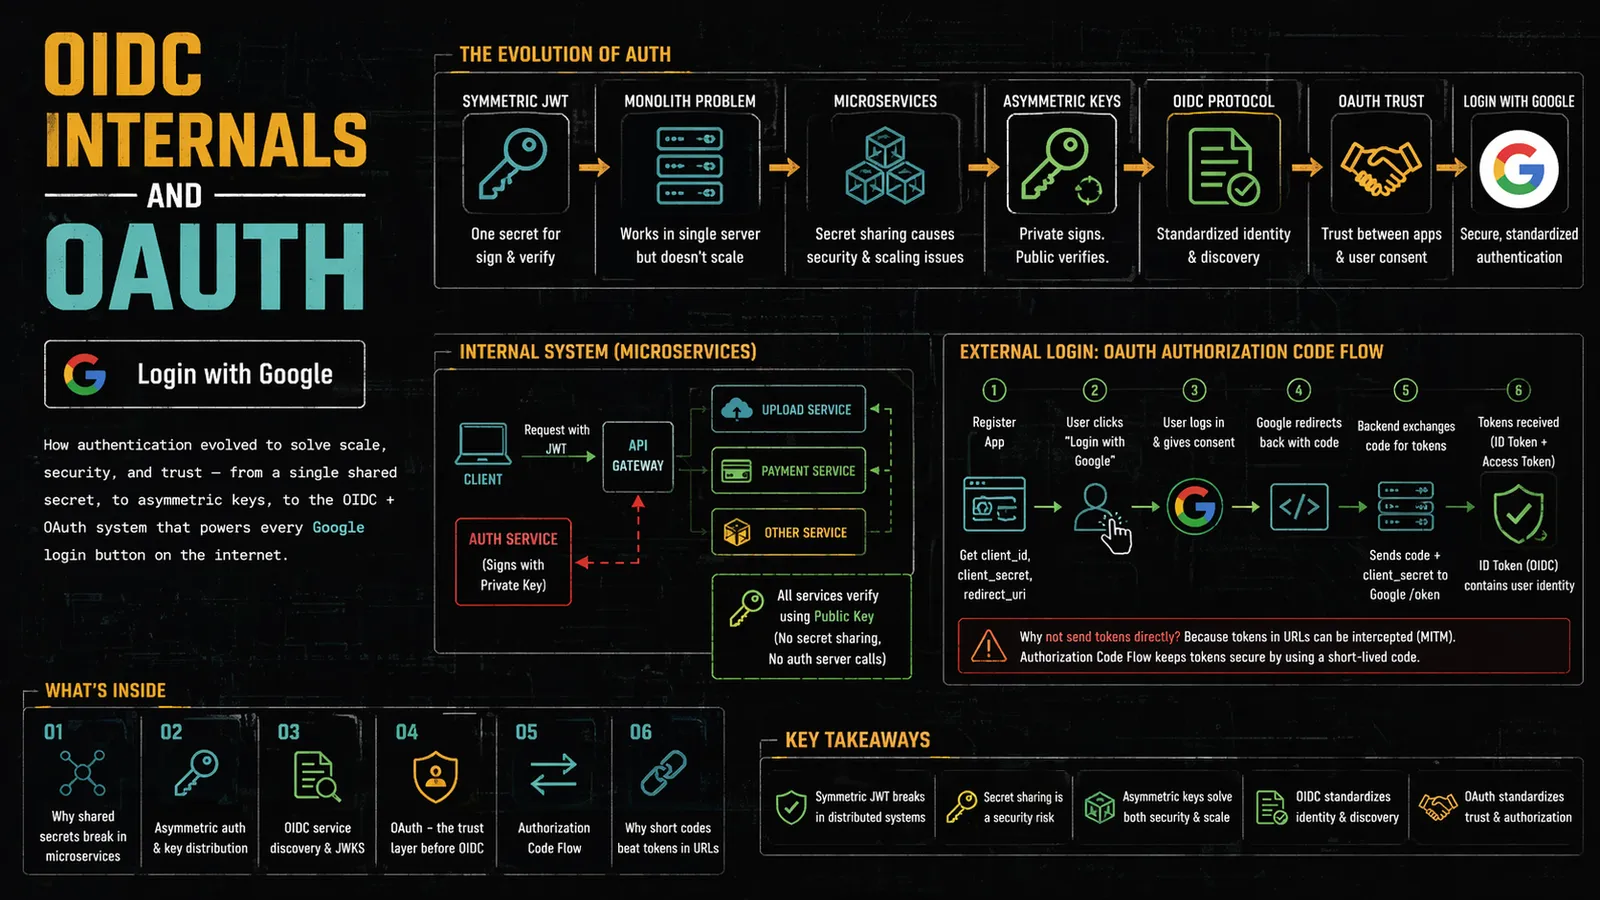
There is a good chance you have used "Login with Google" a hundred times without thinking twice about what is happening behind the scenes. And if you are building something, you have probably copy-pasted some auth library and called it a day. This blog is for the people who want to actually understand what is going on from the very beginning, from the problems that forced these systems to exist, to why OAuth and OIDC are designed the way they are.
We are going to go step by step.
First, Let's Talk About Auth in General
Authentication is basically the system figuring out who you are.
There are two broad approaches:
-
Stateless (Token-based) — The client holds a token. The server trusts the token. No server-side session storage needed.
-
Stateful (Session-based) — The server creates a session and stores it. The client just holds a session ID.
Most modern systems go stateless with JWTs. You log in, get a token, attach it to every request, and the server decodes it to know who you are.
Symmetric Authentication: The Simple Starting Point
When you are building a small app, the simplest thing you can do is symmetric JWT auth. There is one secret key (JWT_SECRET), and it does two jobs:
-
Create the token (sign it)
-
Verify the token (decode it)
Same key. Both sides. Simple.
This works perfectly fine when you have a single server. The key lives in your .env, you sign tokens on login, you verify them on protected routes, done.
But here is where it starts to fall apart.
The Monolith Problem
In a monolith, everything runs inside one server. Auth service, upload service, payment service all of them are just different routes inside the same Express app. The JWT_SECRET is in one place, and every part of the application can access it directly.
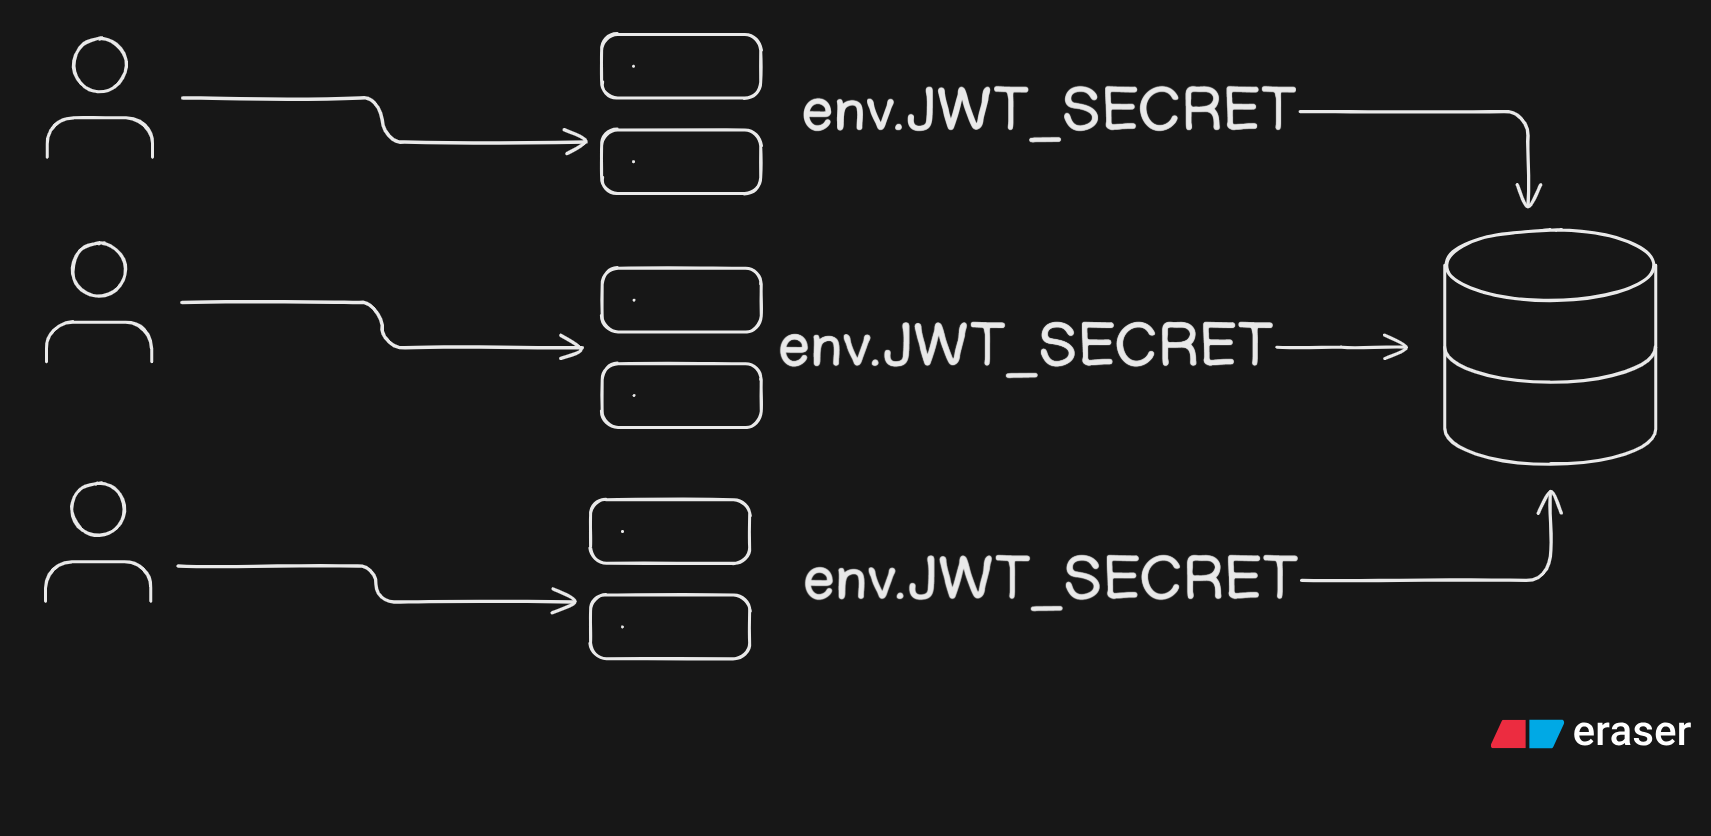
The problem is not the secret sharing here. The problem is the architecture itself.
If auth goes down, everything goes down. If one route has a bug that crashes the process, the entire server is dead. There is no isolation. You cannot independently scale the part of your system that is getting hammered with traffic. If your upload service suddenly gets 10x the load, you cannot just spin up more upload servers without also spinning up more copies of your entire application.
This is the core argument for microservices.
Microservice Architecture: Different Servers, Different Services
The idea is simple: split services into separate servers.
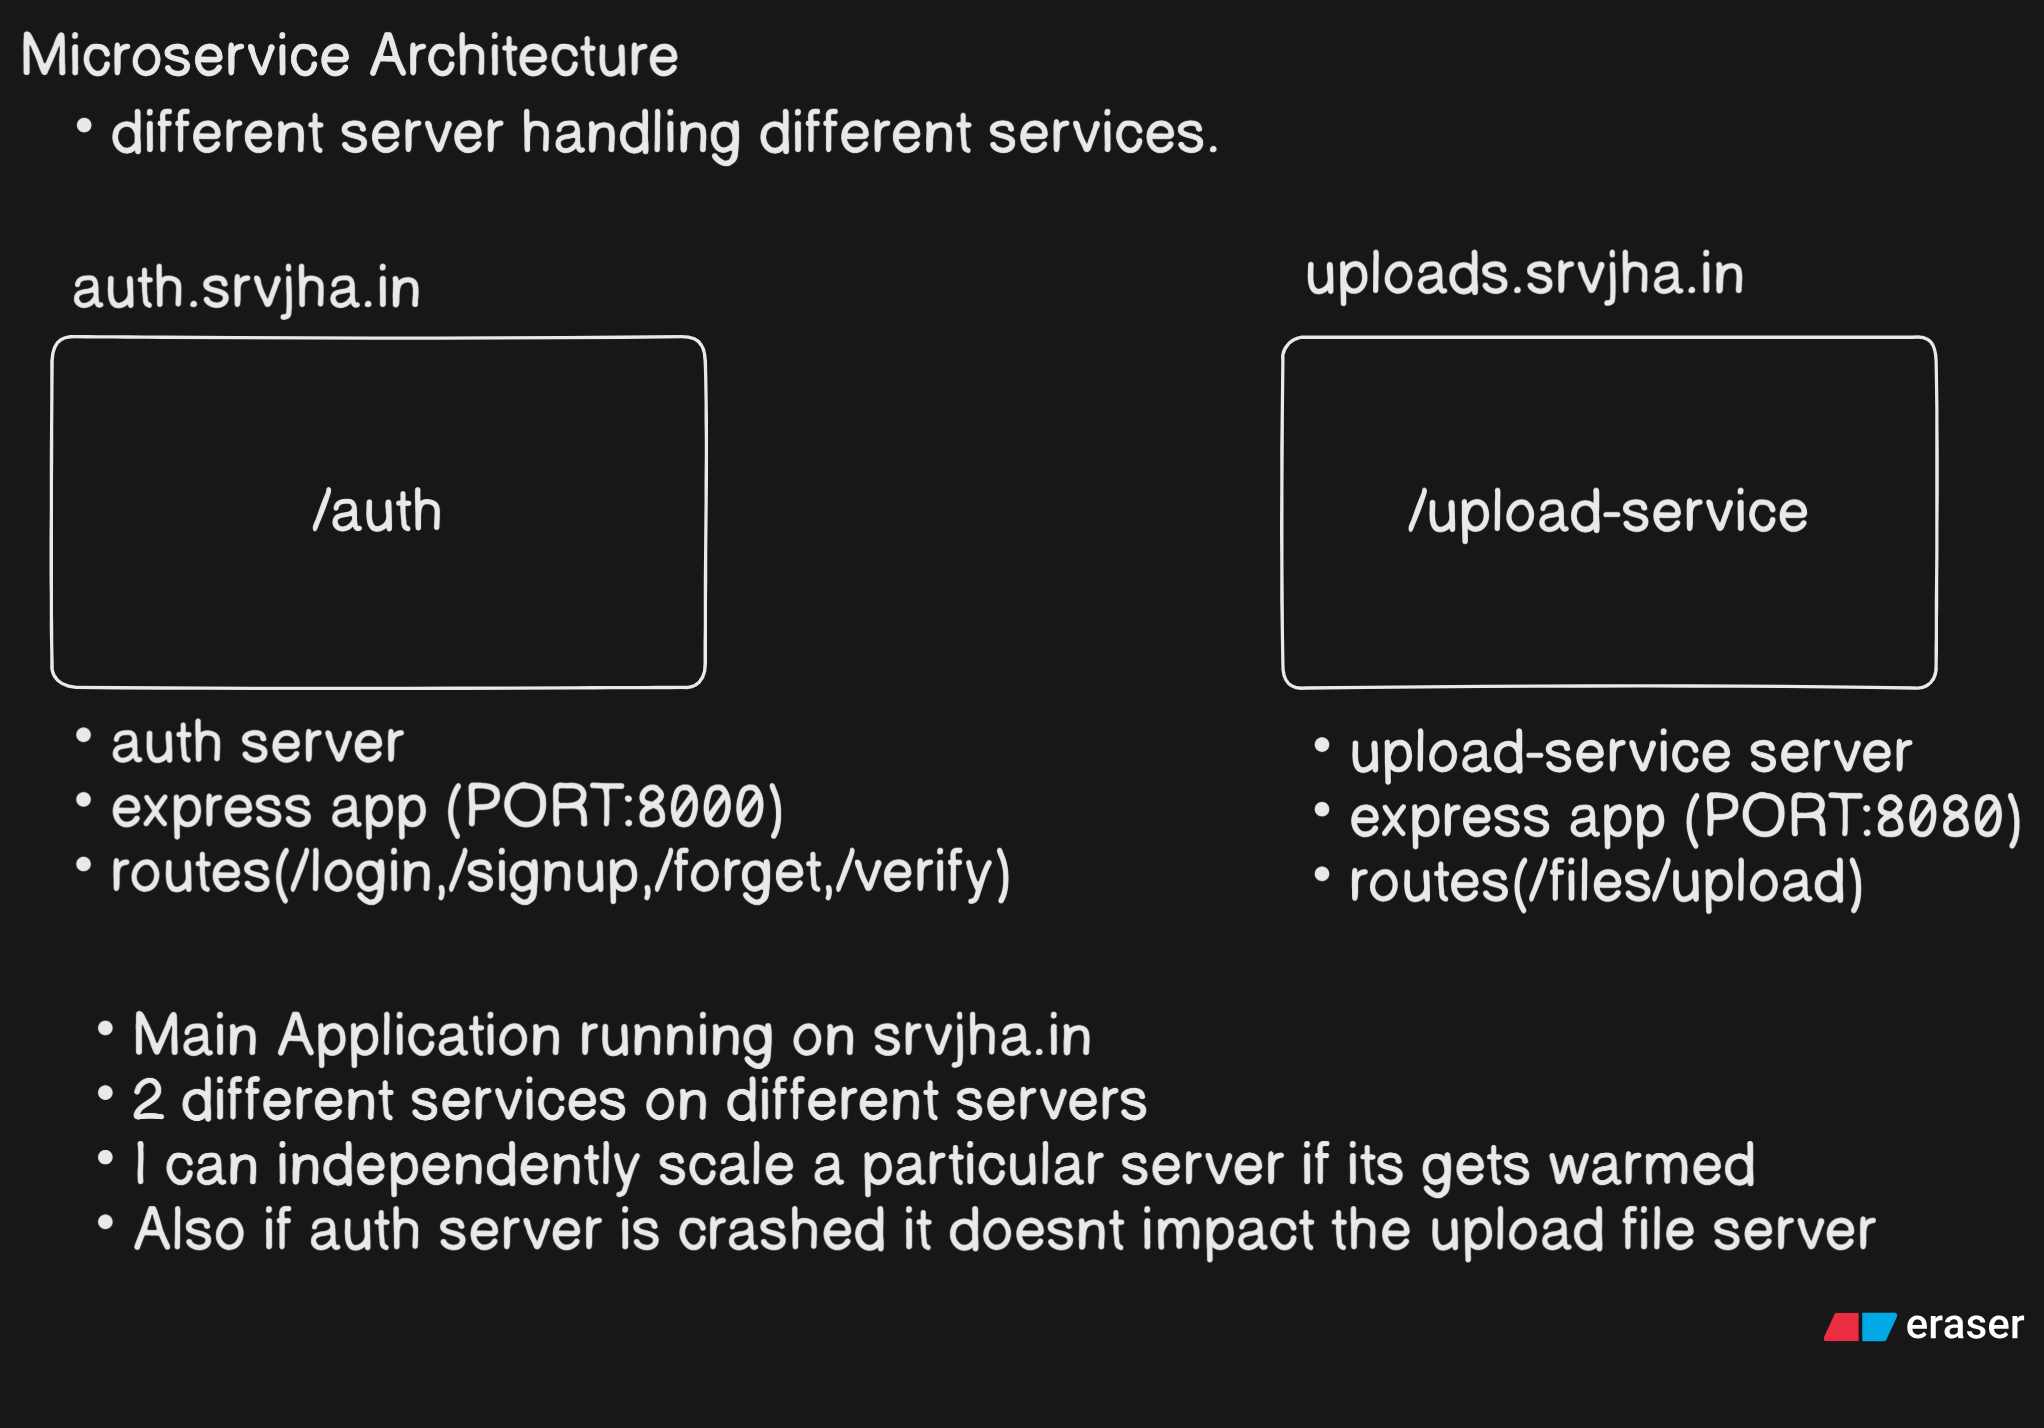
Your main application runs at srvjha.in. Now if auth crashes, uploads still work. If uploads get flooded with traffic, you scale that service independently without touching anything else.
This is genuinely better. But it introduces a new problem that is not obvious until you sit down and think about it.
The Big Problem with Microservices and Auth
Here is the scenario. A user wants to upload a file.
-
User hits the upload server with a token.
-
Upload server needs to verify that token.
-
To verify a JWT, you need the
JWT_SECRET.
So now your upload server also needs JWT_SECRET.
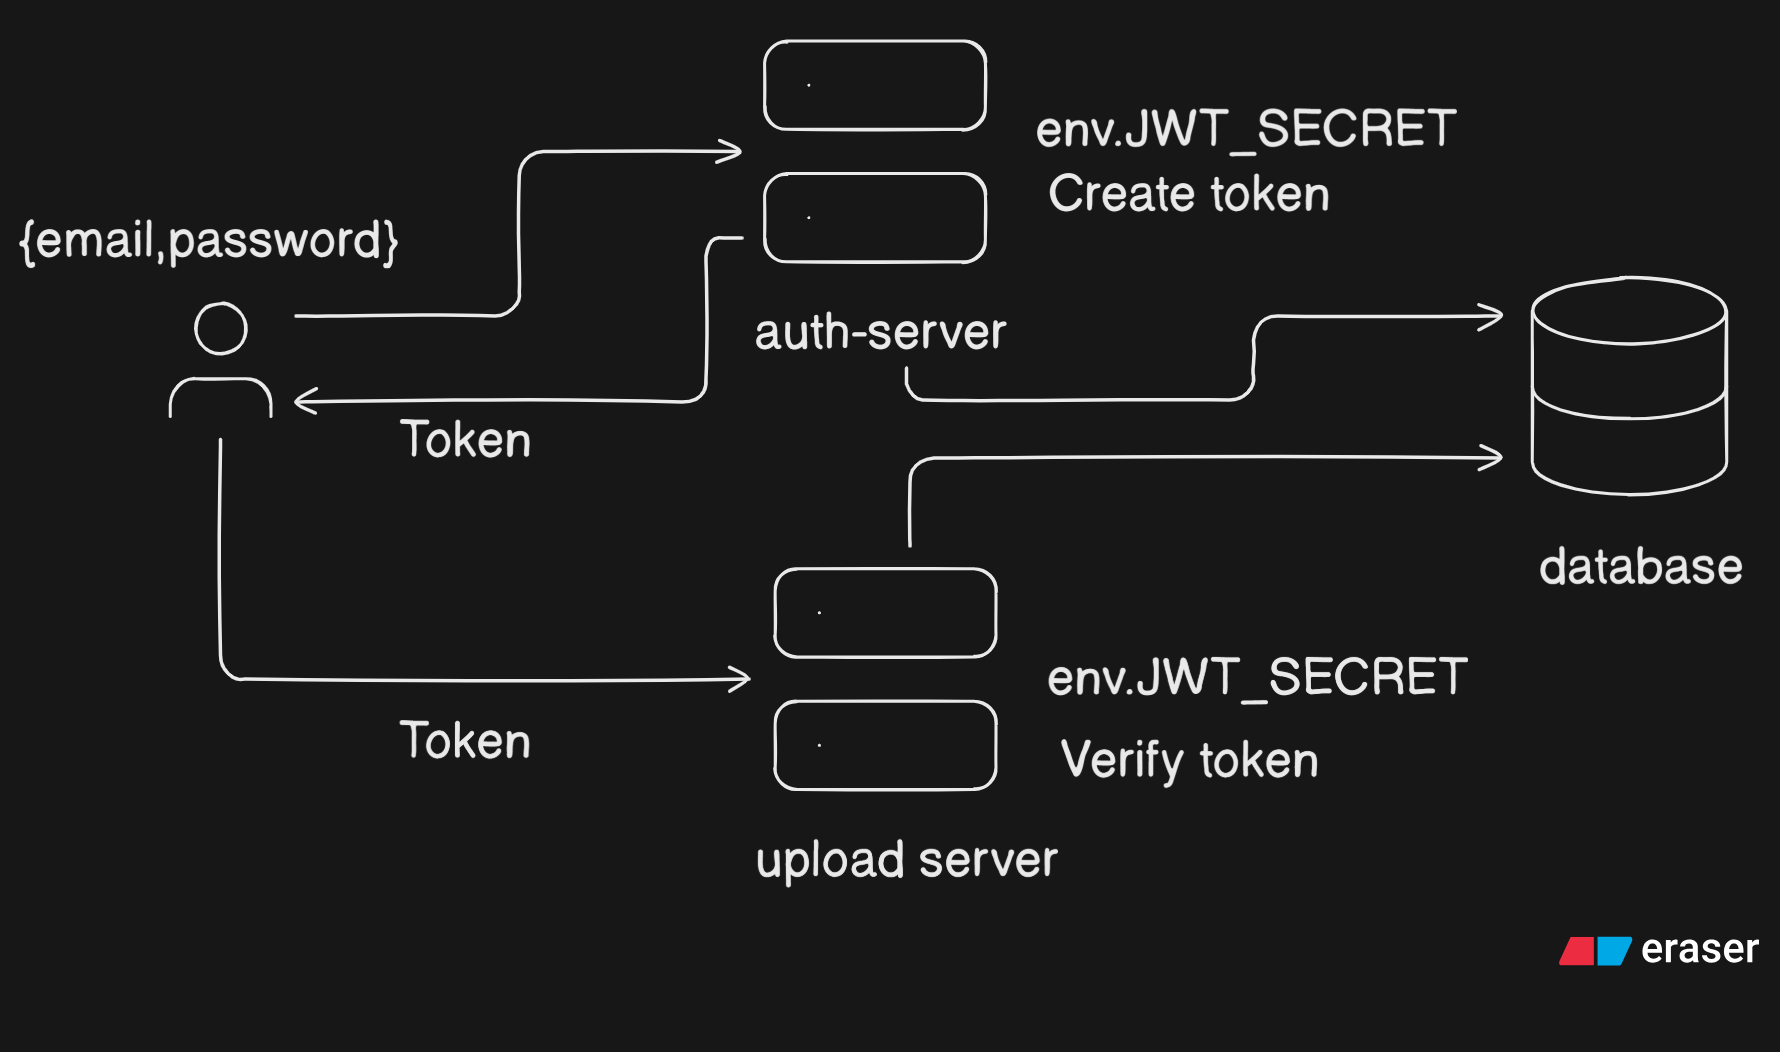
Fine. Add it to the upload server's .env. But now imagine you have 10 different microservices. Payment service, notification service, analytics service, recommendation service... they all need to verify tokens. They all need the secret.
The problems pile up fast:
-
You have to share the secret with every single service. That means 10+ places where this secret exists. The more places a secret lives, the more chances it has to leak.
-
If the secret rotates (which it should, periodically), you have to update it in every single service simultaneously. That is a deployment nightmare.
-
Any service getting compromised means the attacker can now forge tokens for your entire system.
Sharing a secret widely is not security. It is a time bomb.
The Other Approach Internal Auth Calls
Instead of giving every service the secret, what if each service just asked the auth server to verify the token?
The upload server gets a token → instead of verifying it locally, it makes an internal network call to auth server → auth server verifies and returns the user info → upload server proceeds.
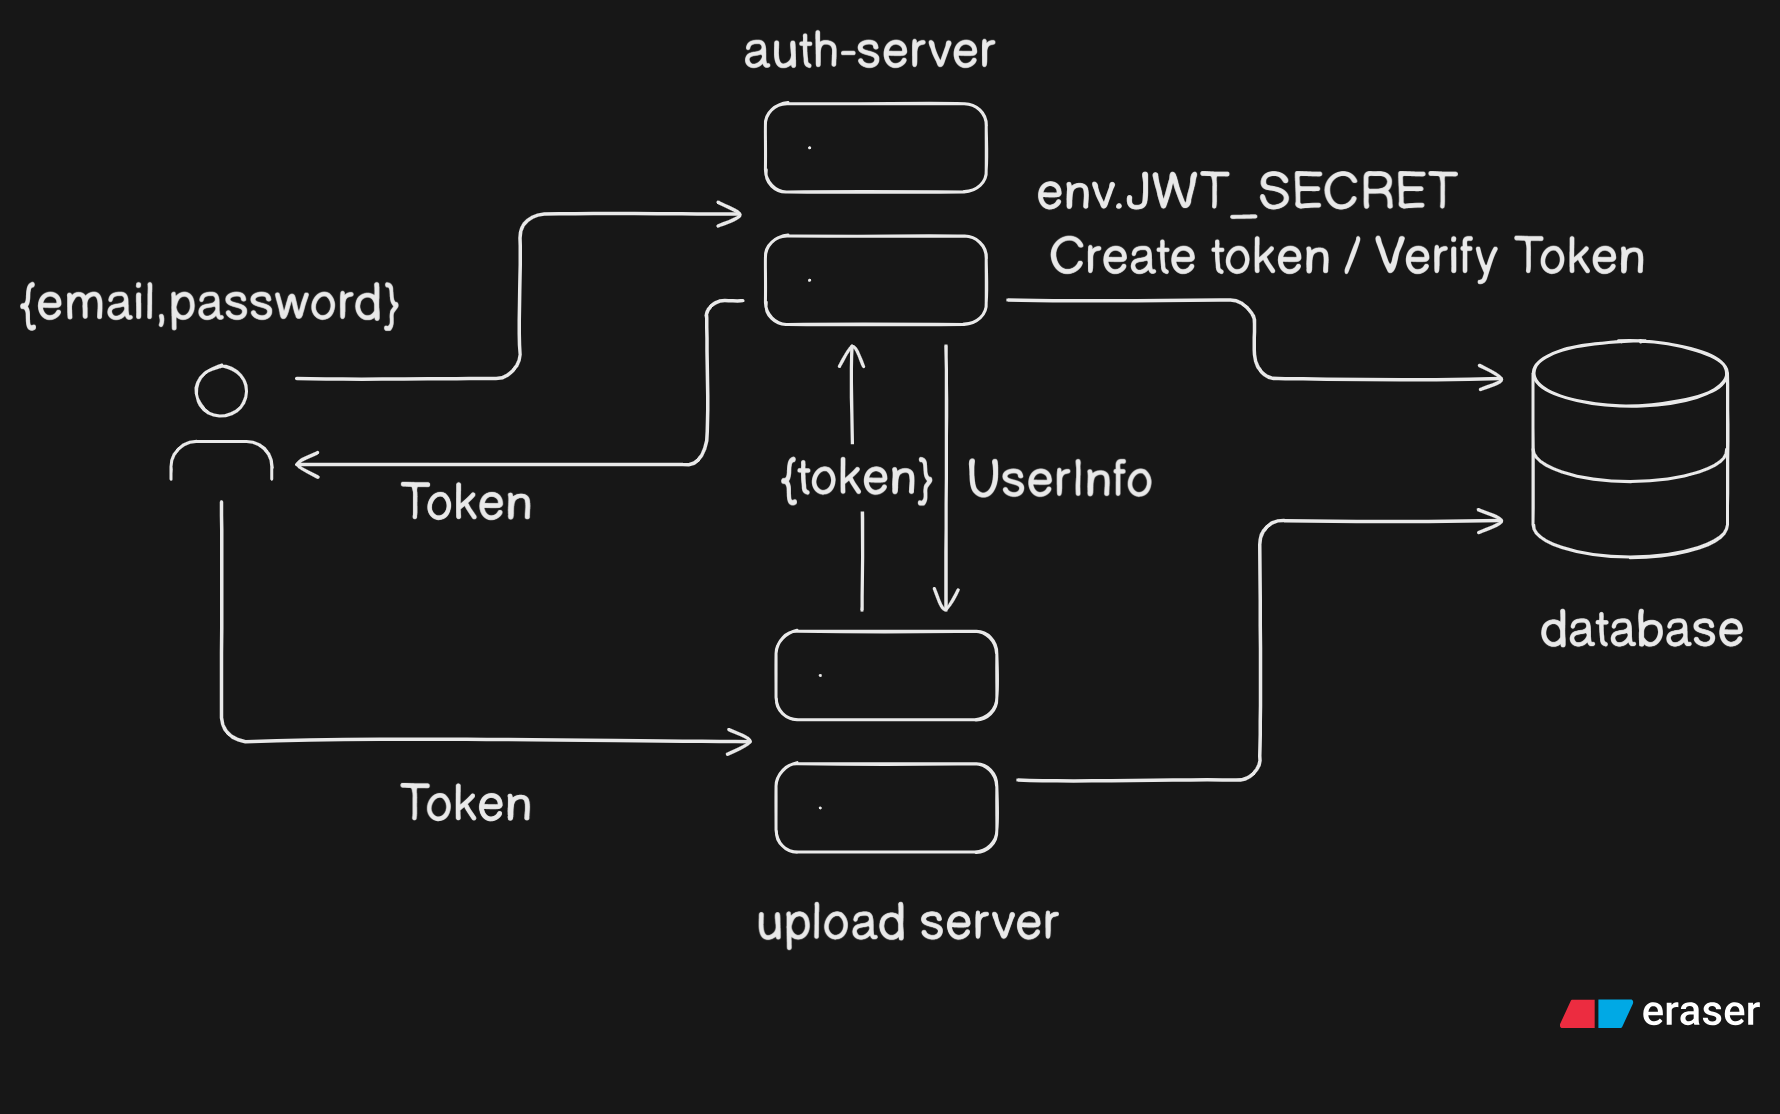
This is actually better from a secret management standpoint. Only the auth server holds the secret. But now you have a different problem.
Every single request to any service triggers an internal call to the auth server. If you have high traffic, the auth server becomes a bottleneck. It gets overwhelmed. It becomes the single point of failure you were trying to avoid in the first place.
So now you have two real problems:
-
Problem 1: Can't give JWT secret to every service
-
Problem 2: Internal verification calls can overwhelm the auth server
This is exactly the problem Google, Microsoft, and every large tech company ran into. They all had multiple services. They all needed a way to handle auth across them without creating these bottlenecks.
How Google Thinks About This: Single Sign-On
Think about Google's product suite. YouTube, Gmail, Drive, Maps, Play Store. When you are logged into Gmail and you open Youtube in a new tab, you are already logged in. You did not log in again. That is SSO(Single Sign-On).
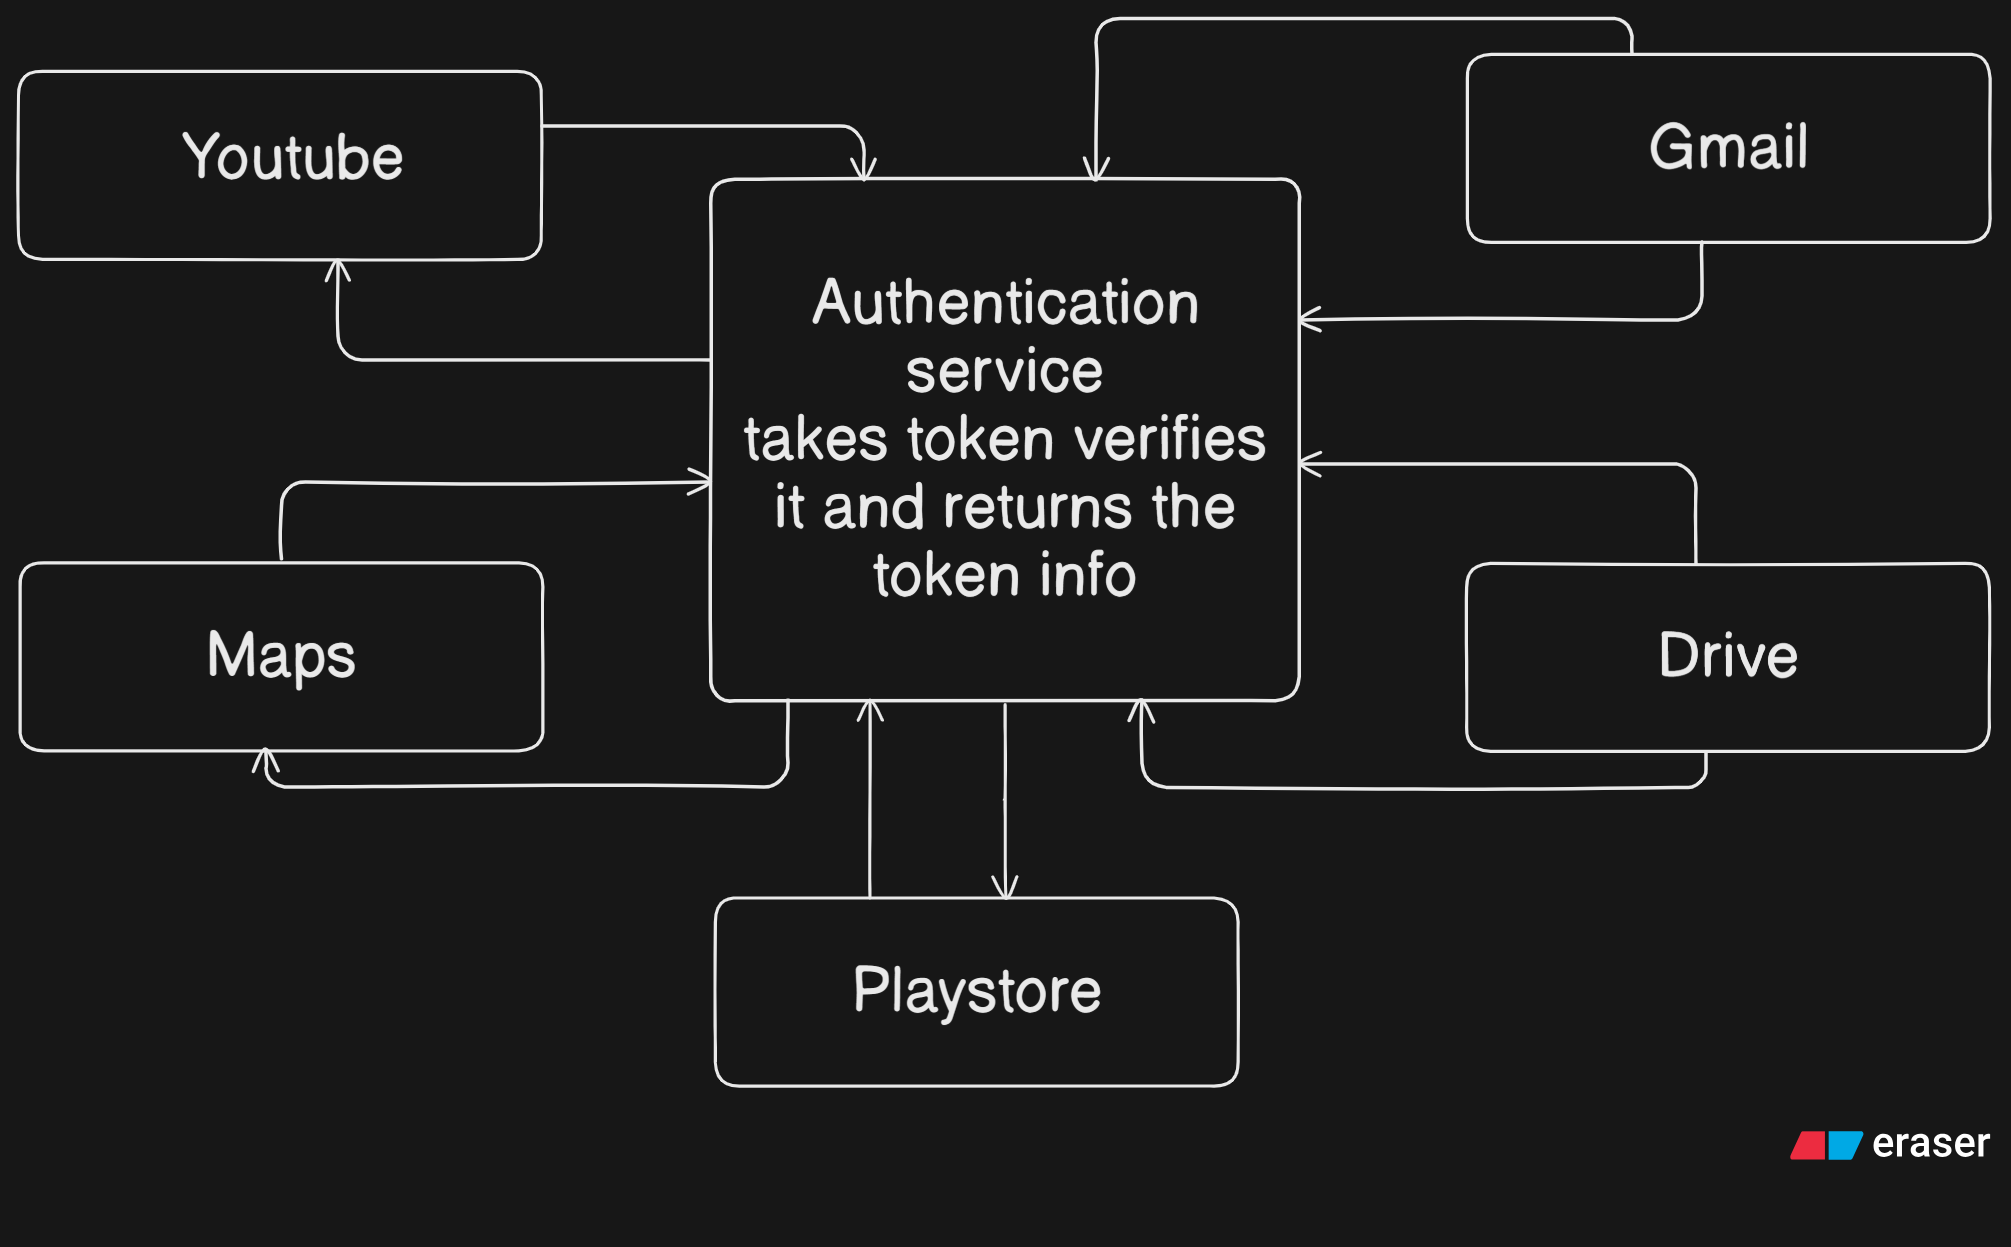
Under the hood, all of these services go through a central authentication service at accounts.google.com. But this auth service does not verify every token on every request. That would be exactly Problem 2.
The solution they built is based on a different cryptographic approach: Asymmetric Authentication.
Asymmetric Authentication:
The Real Solution
Instead of one secret key, you have two:
-
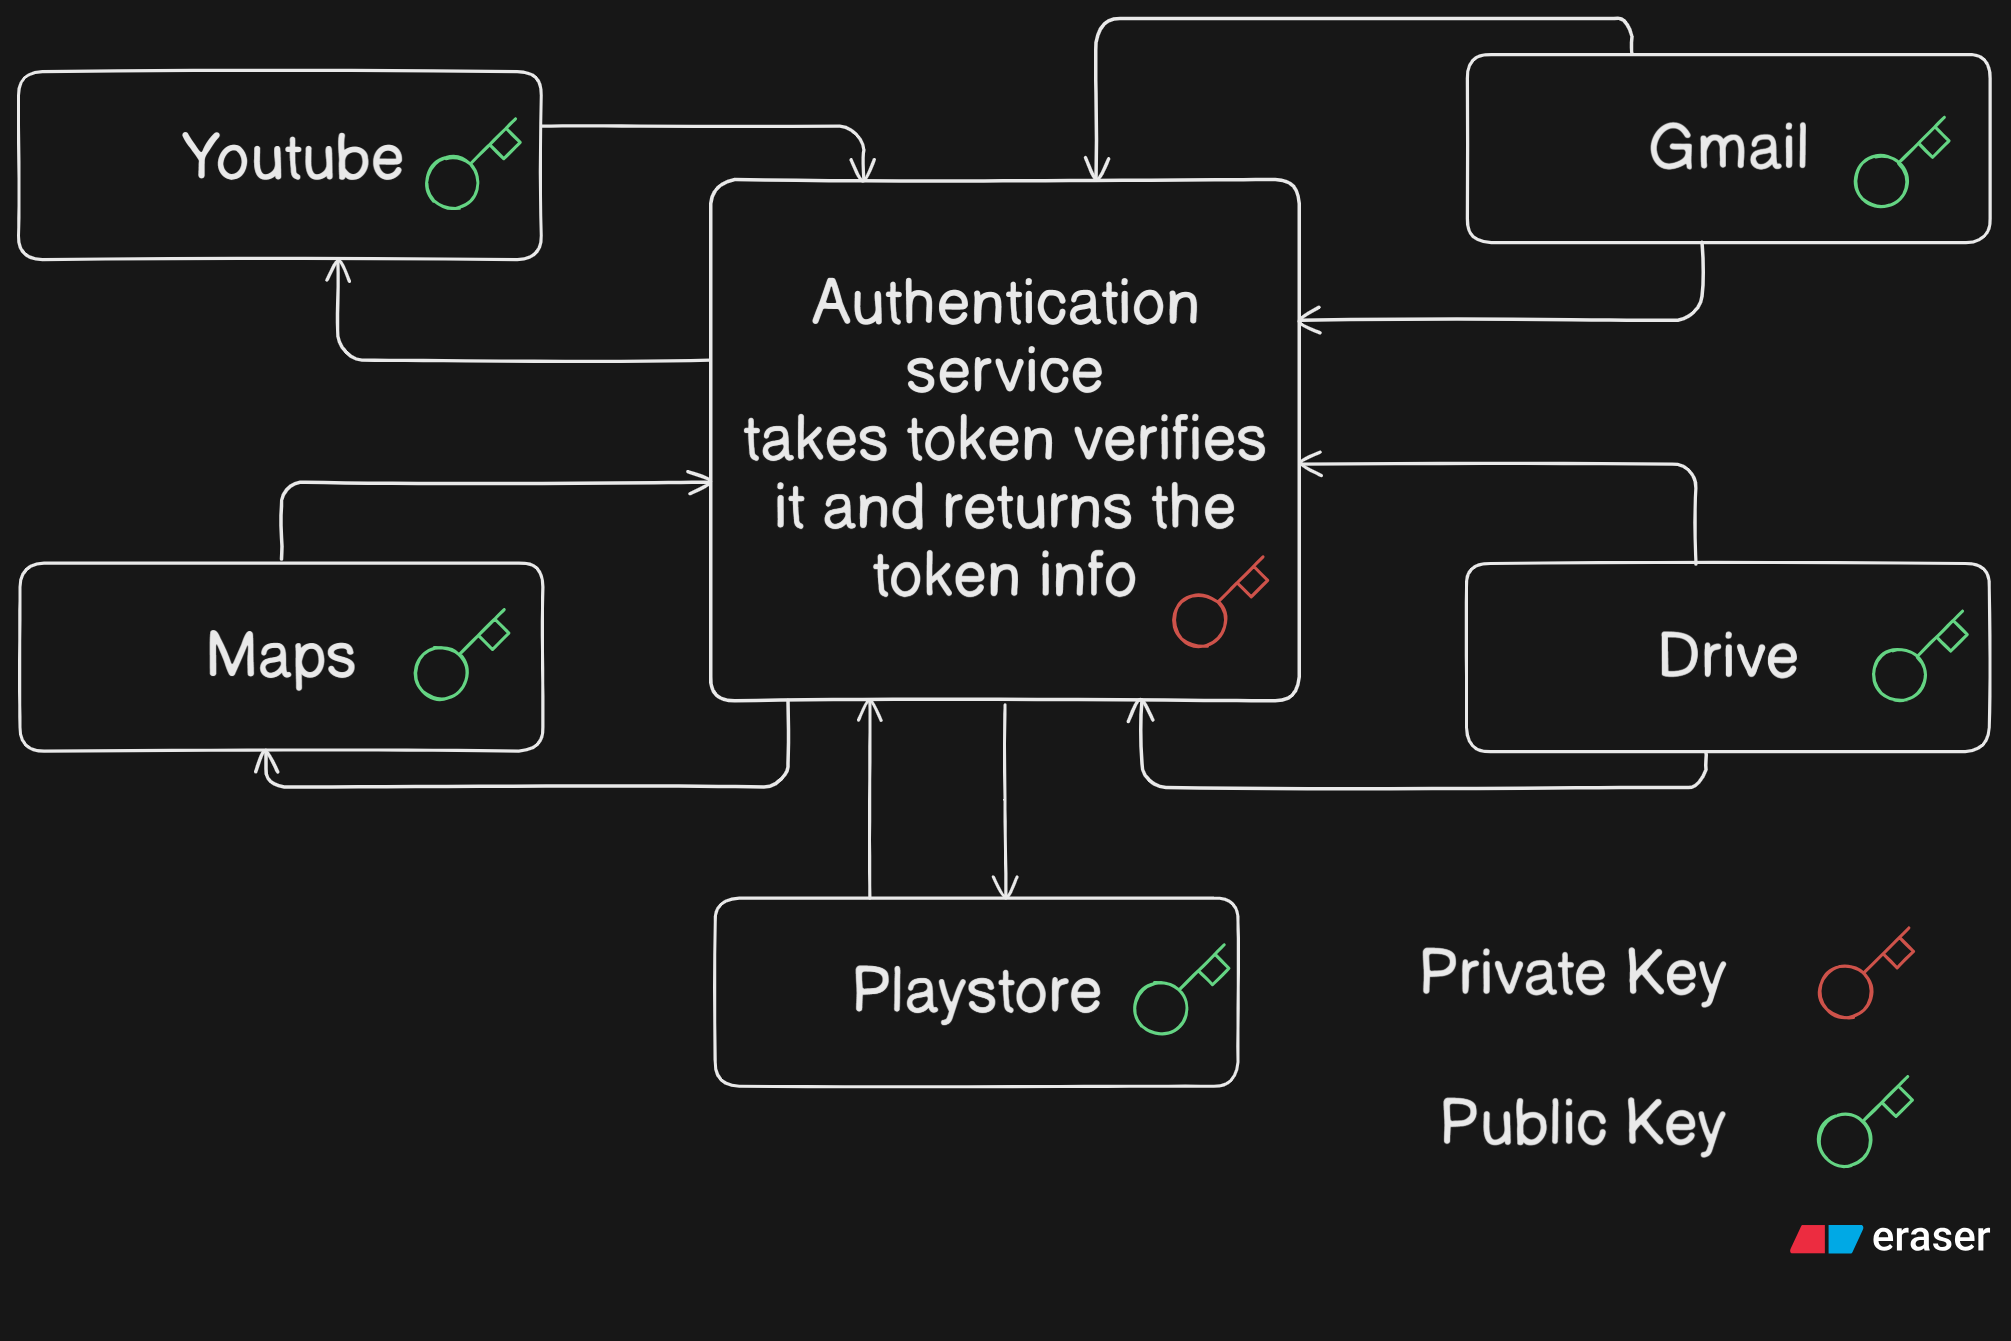
Private Key — Used to create (sign) the token. Stays with the auth server. Never shared.
-
Public Key — Used to verify the token. Can be shared with literally anyone. It is public.
The math behind this is elegant: the public key can verify that a token was signed by the matching private key, but it cannot be used to create new tokens. It is a one-way street.
So the formula becomes:
Token + Public Key = UserInfo  (verification, anyone can do this)
Payload + Private Key = Token  (signing, only auth server can do this)
Think of it like currency notes. Anyone can look at a note and verify it is genuine (public key). But only the mint can print new ones (private key).
Now the flow looks like this:
-
Auth server signs tokens with its private key.
-
Every other service gets the public key.
-
They can verify tokens locally without calling the auth server.
-
If an attacker gets the public key — so what? They cannot forge tokens with it.
This solves Problem 1 (no sensitive secret to protect) and Problem 2 (no central bottleneck for verification).
But There Is Still a Distribution Problem
How do all these services get the public key? And more importantly, when the auth server rotates its keys (which it should, regularly), how do services get the updated public key?
You need a standardized way to distribute public keys. And this is where a standard protocol starts to make sense.
OIDC : OpenID Connect
A bunch of companies (Google, Microsoft, and others) sat down and agreed on a standardized way to build authentication services. The result is OIDC — OpenID Connect.
The other protocol you may hear about is SAML, which works on XML. OIDC works on JSON and is far more common in modern systems.
When you build an auth service that follows OIDC, you have to expose a specific endpoint:
/.well-known/openid-configurationThis is called the Service Discovery endpoint. Hit it, and you get back a JSON document describing everything about the auth service. You can see this live right now at accounts.google.com/.well-known/openid-configuration.
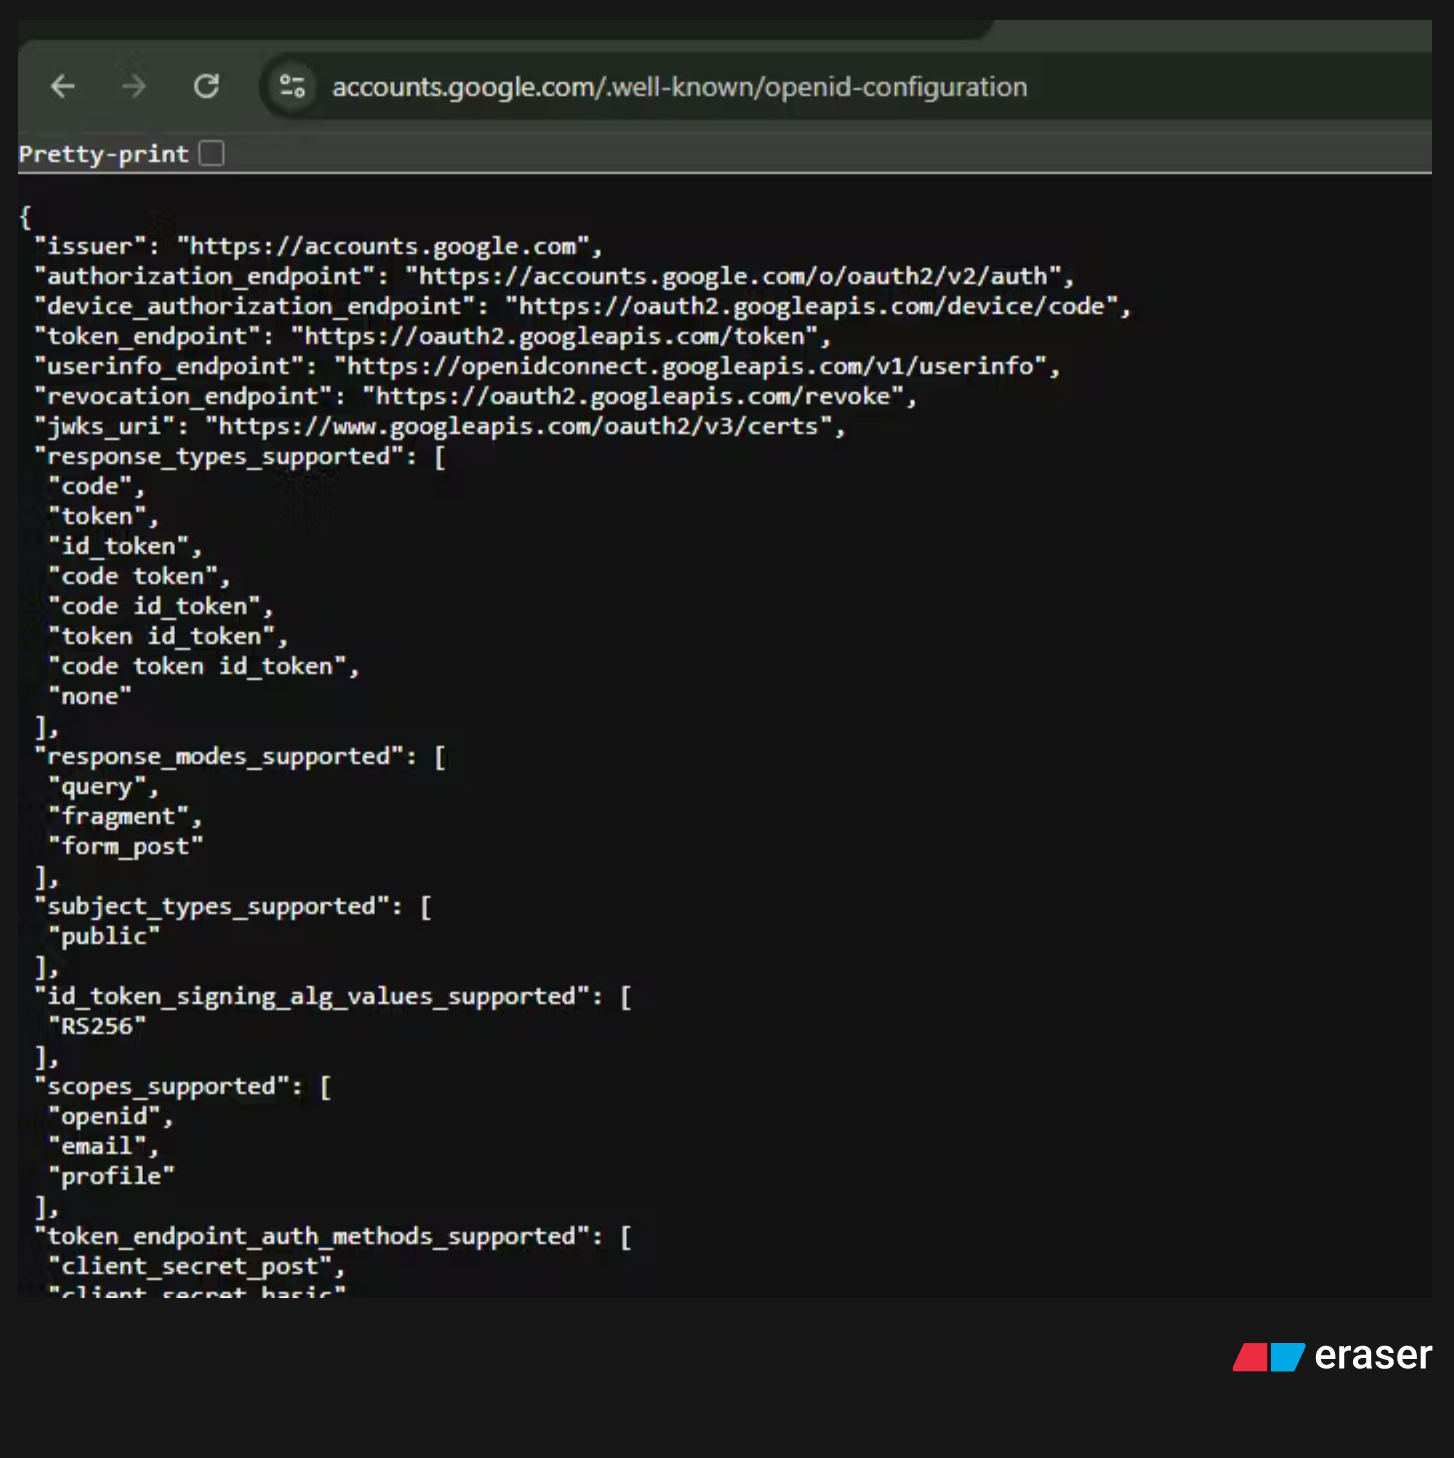
That JSON contains keys like:
-
issuer— the base URL of the auth service -
authorization_endpoint— where users go to log in -
token_endpoint— where tokens are issued -
jwks_uri— where to get the public keys
That last one, jwks_uri, points to the JSON Web Key Set (JWKS) endpoint. This is where any service can fetch the current public keys. Automated. Standardized. Services can even poll this endpoint periodically to pick up rotated keys without any manual intervention.
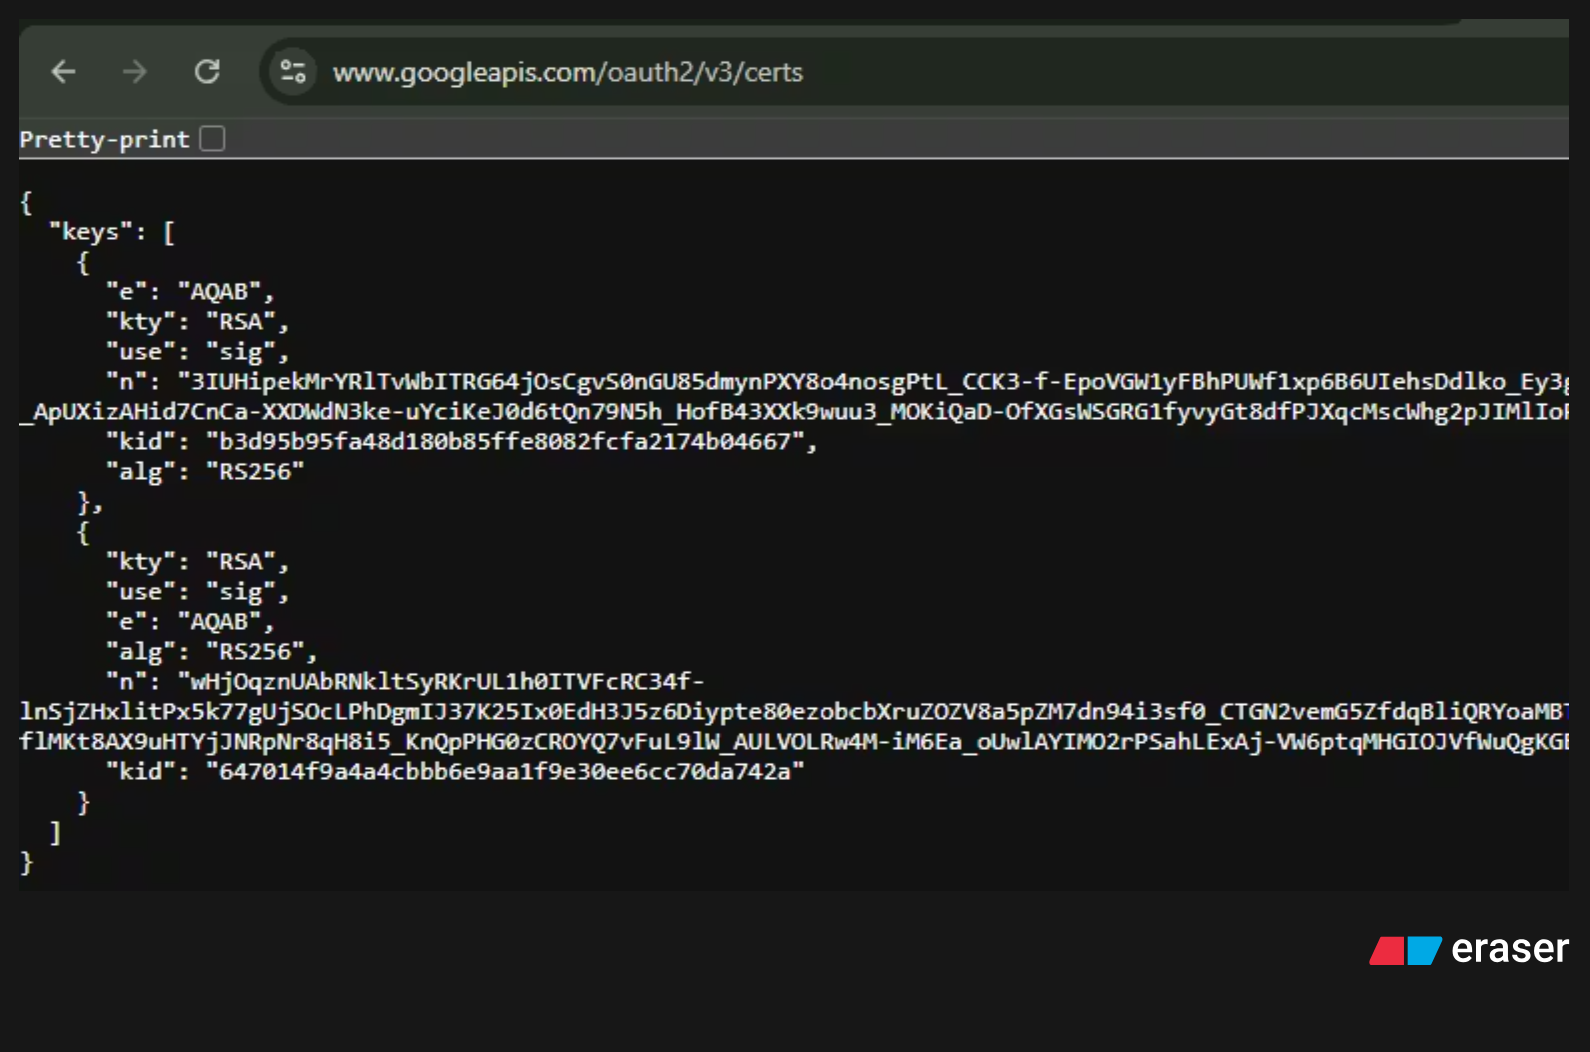
This solves the key distribution problem cleanly.
The Remaining Problem with OIDC Alone
OIDC by default works for internal services. Google's own products : YouTube, Gmail, Drive can use OIDC to authenticate users through accounts.google.com because they are Google's own services.
But what if you are building srvjha.in — an external application — and you want your users to log in with their Google account?
When your app tries to redirect users to the Google login page without any prior setup, Google blocks it. From Google's perspective, it has no idea who srvjha.in is. Why should it trust this random URL with its users' credentials?
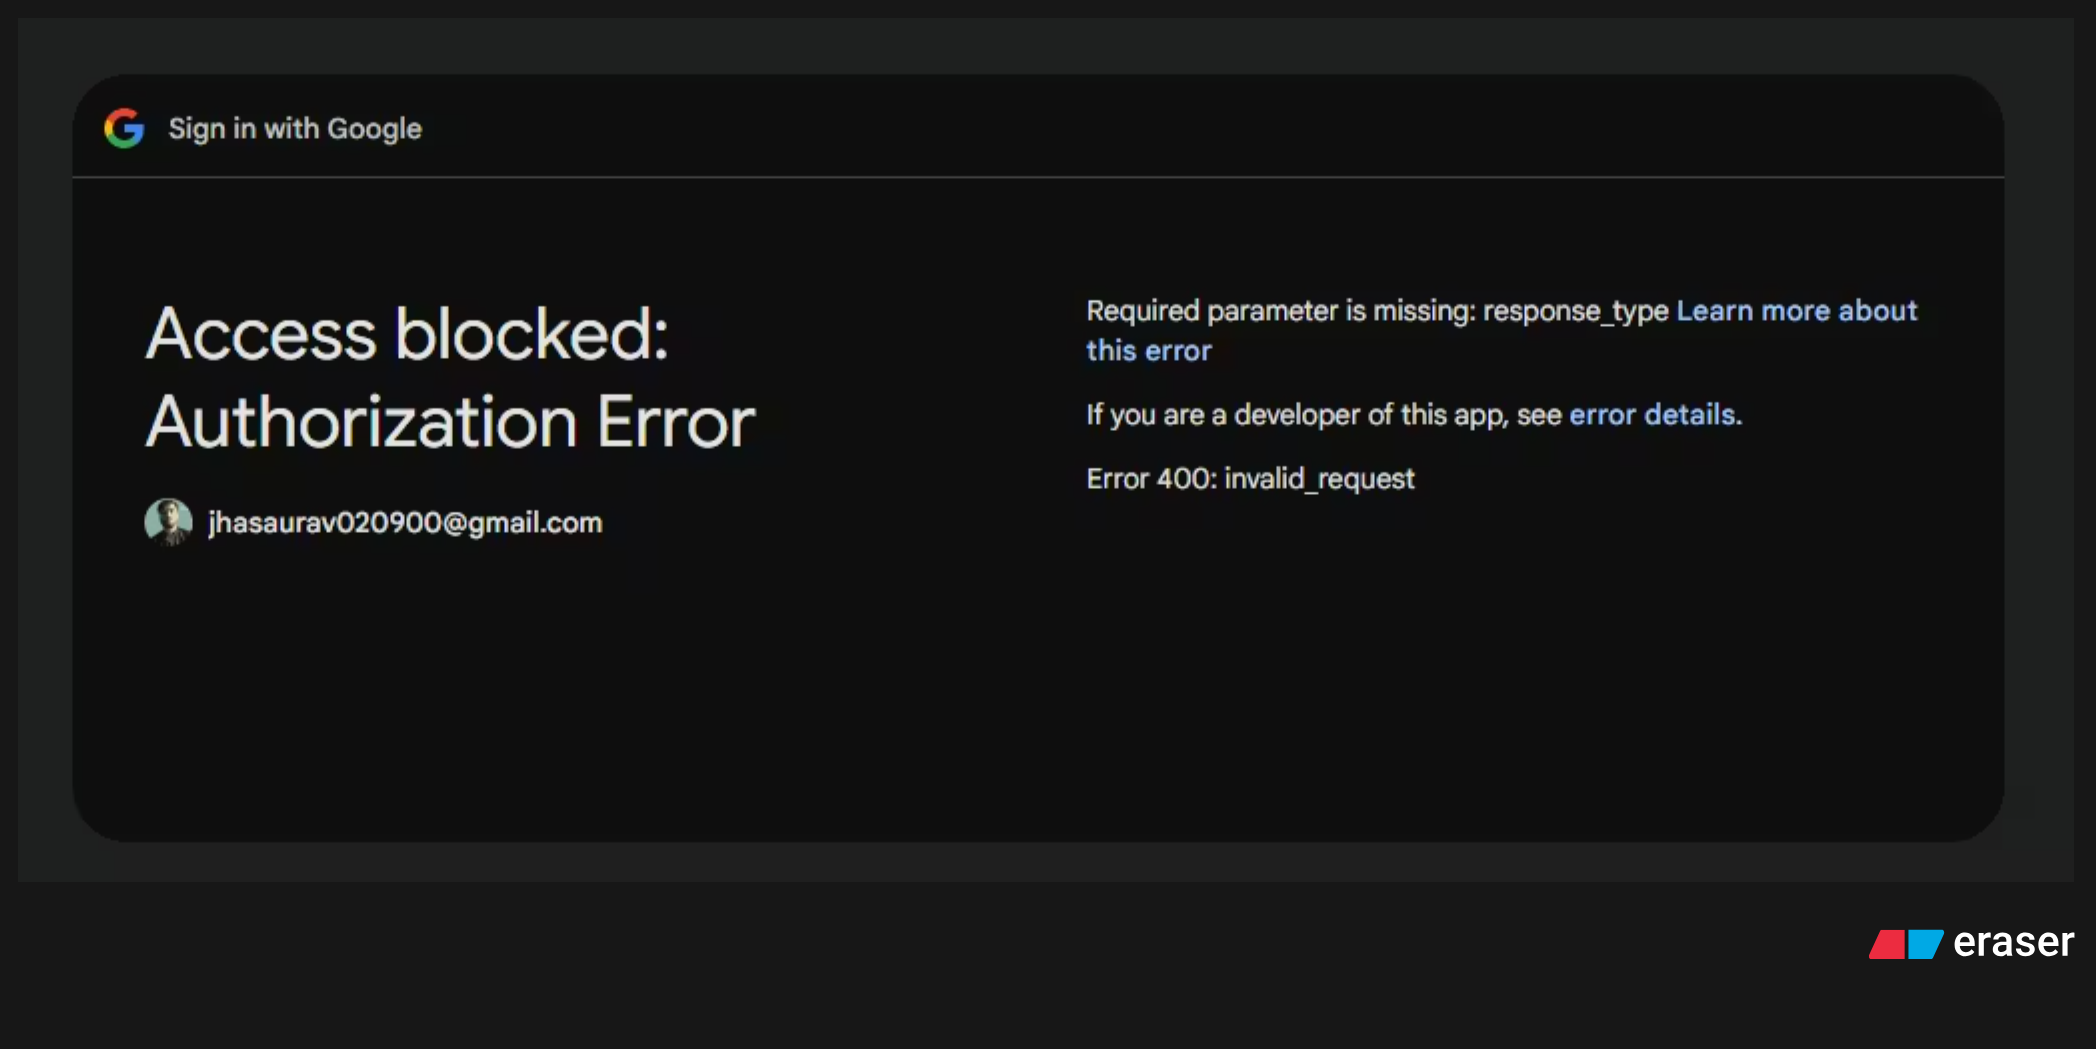
This is where OAuth comes in.
OAuth The Trust Handshake Before OIDC
OAuth is not a replacement for OIDC. It is the layer that comes before OIDC. It is how external applications earn Google's trust so they can then use OIDC to authenticate users.
The process starts with the Developer Console.
You go to Google's developer console and register your application. You fill out a form:
-
App Name
-
Your URL (
srvjha.in) -
Privacy Policy URL
-
Terms & Conditions URL
-
What user data you need
-
Your hosted URL
-
Redirect URI (
srvjha.in/api/redirect-uri)
Google reviews this (or auto-approves for basic access) and gives you back:
client_id
client_secret
Now srvjha.in is a recognized application in Google's system. It has an identity. When your app redirects users to Google's login page with ?client_id=your_id in the URL, Google recognizes it and trusts the request.
Lets go through a complete OAuth + OIDC Flow
What happens when a user clicks "Login with Google" on your app:
Step 1 — Service Discovery
Your app hits accounts.google.com/.well-known/openid-configuration and gets back the JSON with all the important URLs, including authorization_url.
Step 2 — Redirect to Google Login
Your app redirects the user to authorization_url?client_id=your_client_id. Google sees the client_id, recognizes your app, and shows the user Google's login page.
Step 3 — User Logs In and Consents
User logs in with their Google credentials. Google shows a consent form — "srvjha.in wants access to your name and email. Allow?" User clicks Allow.
Step 4 —
The Short Code
Here is an interesting design decision. After consent, Google needs to send something back to your app. The naive approach would be to redirect to your URI with the actual token in the URL:
srvjha.in/api/redirect-uri?token=actual_tokenBut tokens in URLs are dangerous. URLs get logged in browser history, server logs, proxy logs. A token sitting in a URL is a Man-in-the-Middle attack waiting to happen. Anyone intercepting the network traffic or reading logs gets a valid token.
So instead, Google sends a short-lived code (valid for about 1 minute) in the URL:
srvjha.in/api/redirect-uri?code=short_codeThis code is useless on its own.
Step 5 — Code for Token Exchange
Your backend takes this short_code and combines it with your client_secret, then makes a server-to-server call to Google's token_endpoint:
short_code + client_secret → token_endpoint → actual TokenThis exchange happens server-to-server, not through the browser. It never appears in a URL. The client_secret never leaves your server. Even if someone intercepts the short_code from the redirect URL, they cannot exchange it without the client_secret.
This is why the client_secret matters — it is the proof that the entity completing the exchange is actually your registered application and not some attacker who intercepted the code.
Step 6 — You Have a Token
Your server now has a proper JWT, signed by Google's private key. Any service in your system can verify this token using Google's public keys (fetched from jwks_uri). No calls back to Google needed for every request. No shared secrets across services.
Putting It All Together
Let us summarize the whole thing:
Symmetric JWT works fine for a single server. One key, simple, fast. Falls apart when you add multiple services.
Asymmetric JWT solves the multi-service problem. Auth server holds the private key, everyone else gets the public key. But you still need a standardized way to distribute and rotate those public keys.
OIDC is that standard. It defines the /.well-known/openid-configuration endpoint, the JWKS endpoint for public key distribution, and a consistent contract for how auth services expose their functionality. If you build your auth service following OIDC, any other system knows exactly how to interact with it.
OAuth is the trust layer on top of OIDC that allows external applications (applications that are not part of your organization) to use your OIDC endpoints. You register your app, get a client_id and client_secret, and now Google (or any OAuth provider) knows who you are and can safely let your users authenticate through them.
The final flow:
OAuth  →  establishes trust between your app and the identity provider
OIDC   →  handles the actual token exchange and user info retrieval
OAuth enables the relationship. OIDC does the work.
One Last Thing :
Why the Short Code Pattern Is Clever
The two-step code-then-token exchange is worth dwelling on for a second because it is a genuinely elegant security design.
The problem it solves is: how do you get a sensitive token from Google's servers to your backend without ever exposing it in a URL?
The answer is: you do not send the token through the browser at all. You send a throwaway code through the browser (where it might get logged or intercepted), and then you do the real exchange server-to-server, authenticated with your client_secret. Even if someone steals the code, it expires in a minute, and without your secret, they cannot complete the exchange.
This pattern sometimes called the Authorization Code Flow is the standard way OAuth works and the reason it has held up as a security model for so long.
Examples:
When you use a library like passport.js, next-auth, better-auth, or any other auth abstraction, this is what it is doing under the hood. It is hitting the discovery endpoint, redirecting to the authorization URL with your client_id, handling the redirect with the code, exchanging it for a token, and then giving you the user object.
The library abstracts the steps, but the steps are always the same. Understanding them means you know what to look at when something goes wrong, you know why your redirect URI needs to match exactly, and you understand why rotating your client_secret is a security practice and not just overhead.
Originally published on Hashnode